前言
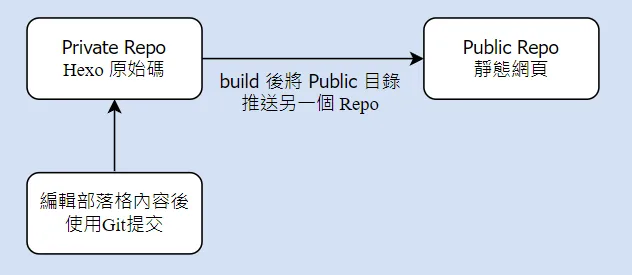
- 編輯部落格內容後使用 Git 將更變推送到 Github 私人倉庫
- 私人倉庫的 Workflow 會將原始碼 build 成靜態網頁
- 將 public 目錄下的檔案(編譯後的靜態網頁),推送到公開倉庫
- 將這個倉庫設定為 GitHub Page
GitHub Actions 介紹
GitHub Actions 是 GitHub 提供的一項 CI/CD(持續集成和持續部署)服務,讓使用者能夠自動化軟件開發工作流。
它允許你在特定事件發生時執行定義好的動作,例如程式碼推送、Pull Request 創建、Release 發布等,
並使用 YAML 文件來定義你的工作流。
GitHub Actions 使用
在 Github Setting 產生一個 Key
-
點擊 Developer Settings

點擊 Developer Settings -
點擊 Generate new token
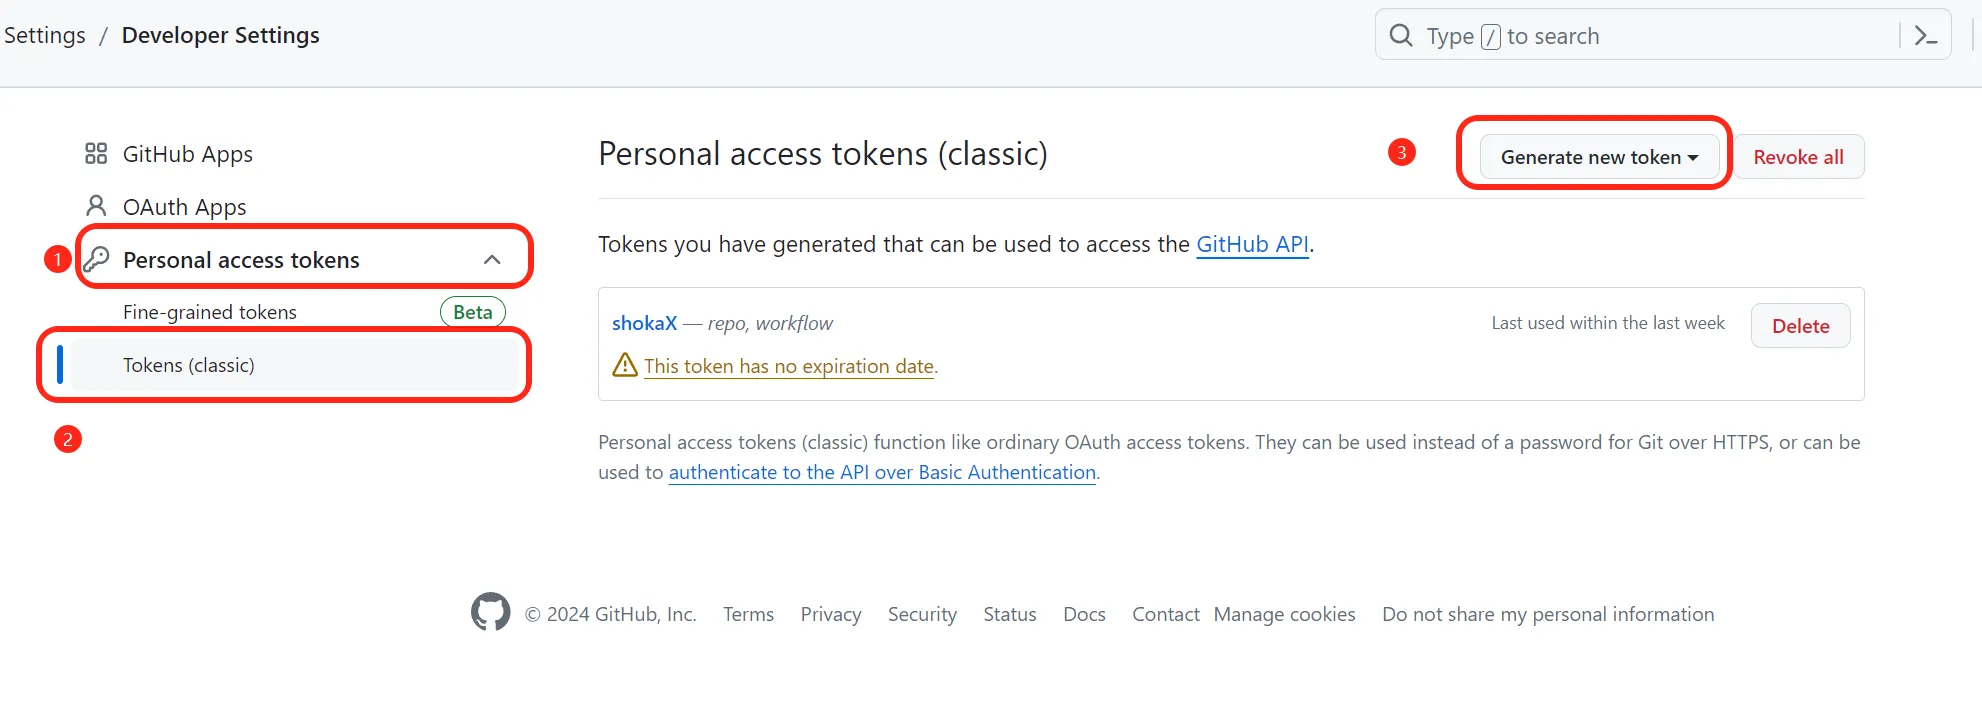
點擊 Generate new token -
權限添加 workflow
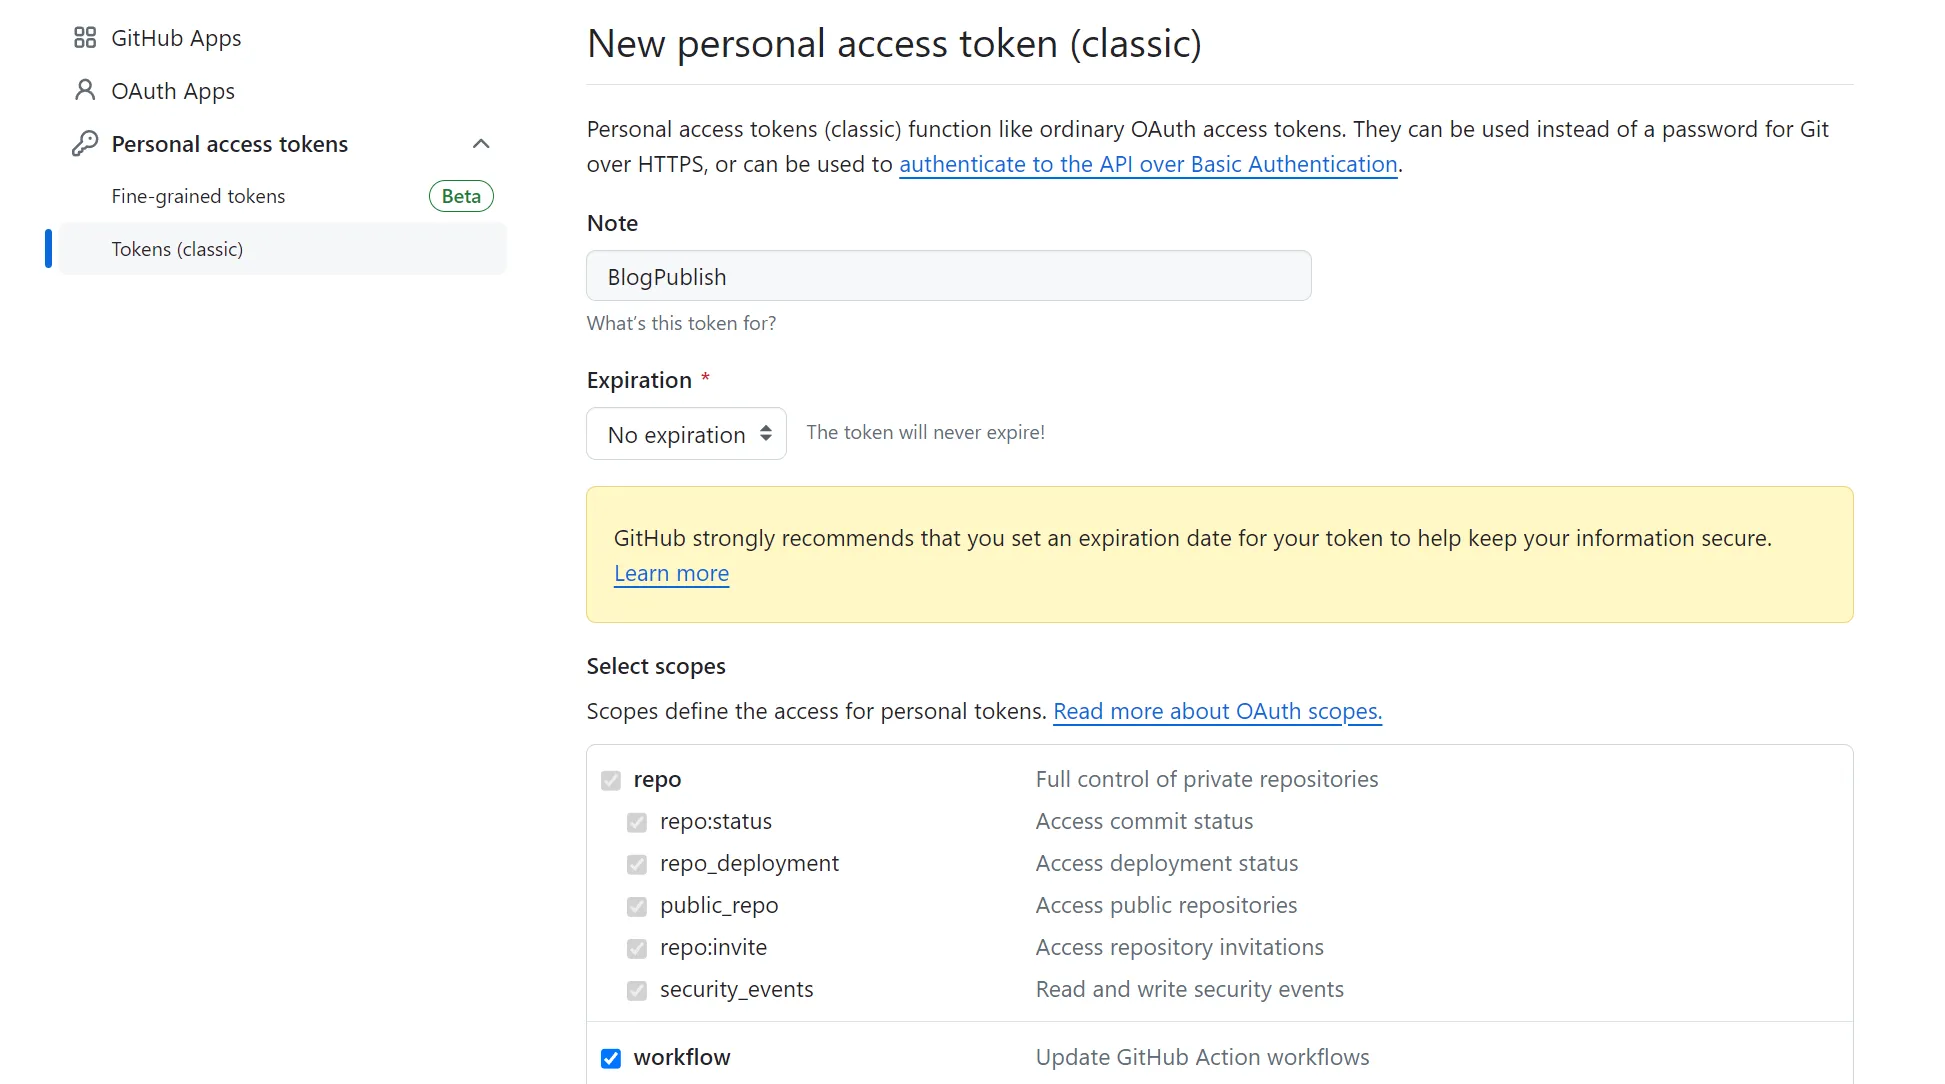
權限添加 workflow -
回到專案的 repo Setting
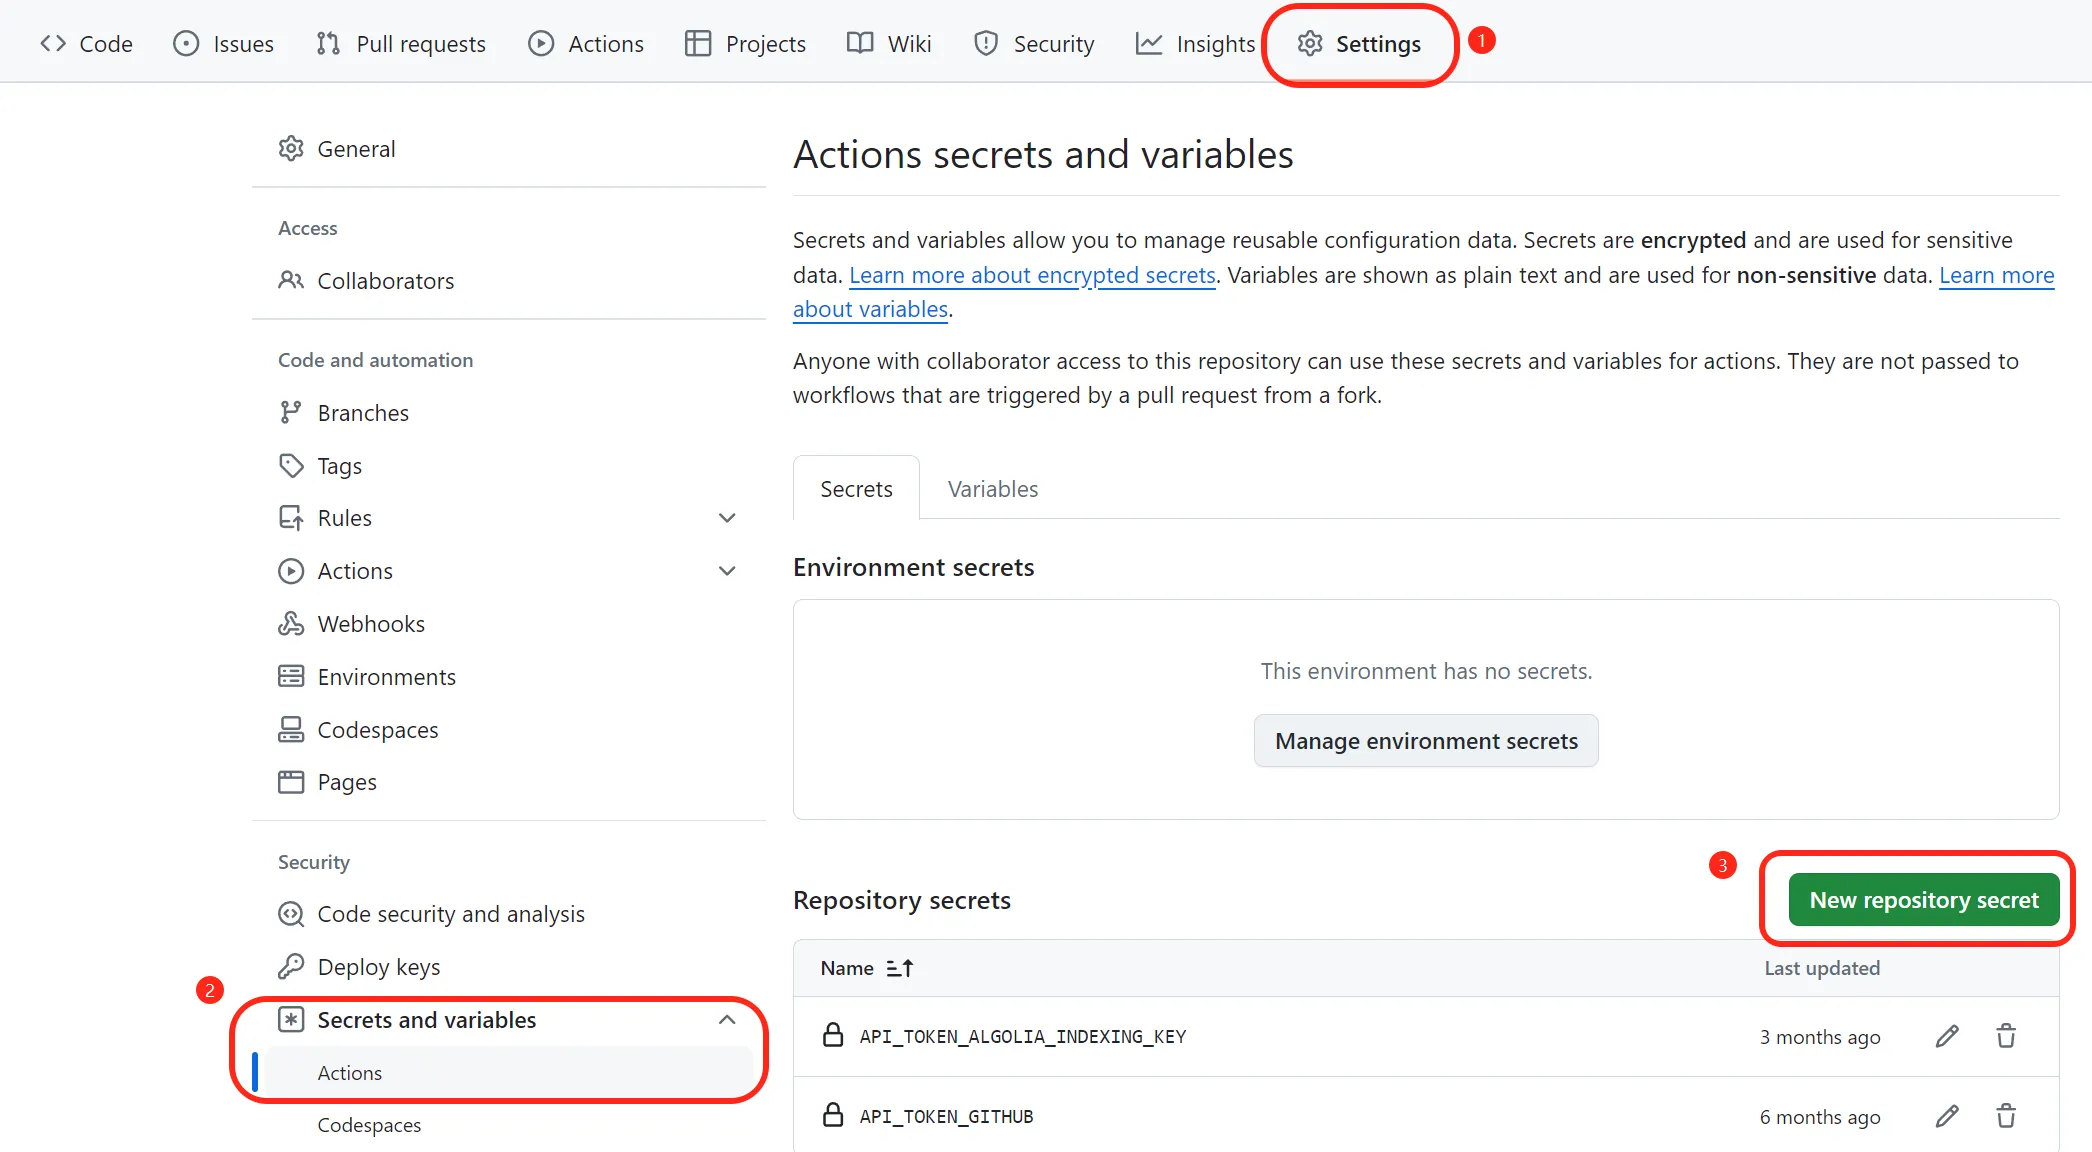
回到專案的 repo Setting -
Name 填入自定義名稱, secret 填入 第
3步產生的 token
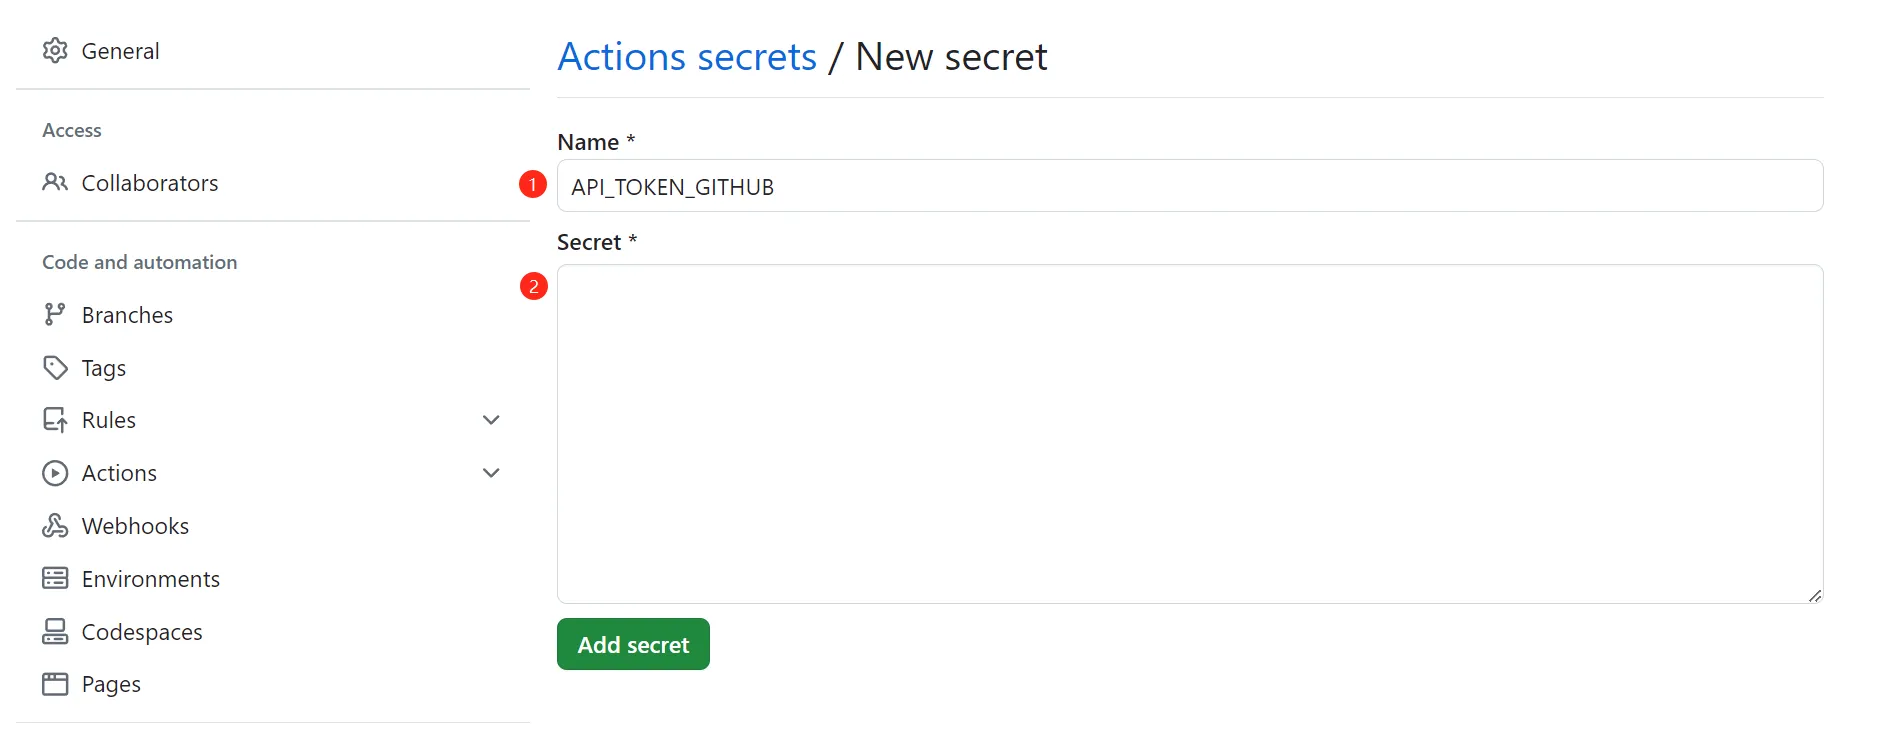
Name 填入自定義名稱, secret 填入 第`3`步產生的 token
Workflow Trigger
當有新的提交推送到 main 分支時,這個工作流程會被觸發。
on:
  push:
    branches:
      - main
Jobs
這個工作流程包含一個名為 build-and-deploy 的作業。
這個作業在最新版本的 Ubuntu 環境中運行,並設置了 20 分鐘的超時限制。
jobs:
  build-and-deploy:
    runs-on: ubuntu-latest
    timeout-minutes: 20
Steps
- 使用 actions/checkout 來將存儲庫中的所有文件和目錄複製到 GitHub Actions 執行器的工作目錄中。
- name: Checkout Repository
uses: actions/checkout@v4- 設置 Node.js 環境,使用版本 18。
- name: Set up Node.js
  uses: actions/setup-node@v4
  with:
node-version: 18- 使用 shokax-can
- 可以在安裝其他沒有包含在 shokax-can 的 moudle,例如:
hexo-generator-sitemap。
- name: shokax-can
  run: |
    git clone https://github.com/theme-shoka-x/shokax-can --depth=1
    cd shokax-can
    npm install -g pnpm
    pnpm install
pnpm install hexo-generator-sitemap- 將安裝好的 node_modules 複製到原本的工作目錄
- name: Copy Modules
run: cp -r shokax-can/node_modules node_modules- 全局安裝 Hexo CLI。
- name: Install Hexo CLI
run: npm install -g hexo-cli- 替換文件 post.js
如果對主題原始碼有修改,可以在這邊替換。
- name: replace
  working-directory: ./
  run: |
cp replace/post.js node_modules/hexo-theme-shokax/source/js/_app/page/post.js- Build the Site
- name: build
  working-directory: ./
  run: |
hexo generate- 使用 Algolia 進行搜索索引。它從 GitHub Secrets 中提取 HEXO_ALGOLIA_INDEXING_KEY。
- name: algolia
  working-directory: ./
  run: |
    export HEXO_ALGOLIA_INDEXING_KEY=${ { secrets.API_TOKEN_ALGOLIA_INDEXING_KEY }}
    hexo algolia
# ^ 去掉這個空格,因為不能正確渲染2個括號- Push to Another Repository
這一步使用 cpina/github-action-push-to-another-repository,
將生成的靜態網站文件推送到另一個存儲庫 minz71/minz71.github.io 的 main 分支,以部署到 GitHub Pages。
並使用 GitHub Secrets 中的 API_TOKEN_GITHUB 來進行身份驗證。
- name: Pushes to another repository
  uses: cpina/github-action-push-to-another-repository@main
  env:
    API_TOKEN_GITHUB: ${ { secrets.API_TOKEN_GITHUB }}
  #                   ^ 去掉這個空格,因為不能正確渲染2個括號
  with:
    source-directory: "./public"
    destination-github-username: "minz71"
    destination-repository-name: "minz71.github.io"
    user-email: XXX@gmail.com
    target-branch: main
Workflows 的完整範例
- GitHub Actions 的工作流文件在
.github/workflows目錄中
name: Hexo ShokaX Build and Deploy
on:
  push:
    branches:
      - main

jobs:
  build-and-deploy:
    runs-on: ubuntu-latest
    timeout-minutes: 20

    steps:
      - name: Checkout Repository
        uses: actions/checkout@v4

      - name: Set up Node.js
        uses: actions/setup-node@v4
        with:
          node-version: 18

      - name: shokax-can
        run: |
          git clone https://github.com/theme-shoka-x/shokax-can --depth=1
          cd shokax-can
          npm install -g pnpm
          pnpm install
          pnpm install hexo-generator-sitemap

      - name: Copy Modules
        run: cp -r shokax-can/node_modules node_modules

      - name: Install Hexo CLI
        run: npm install -g hexo-cli

      # - name: replace
      #   working-directory: ./
      #   run: |
      #     cp replace/post.js node_modules/hexo-theme-shokax/source/js/_app/page/post.js

      - name: build
        working-directory: ./
        run: |
          hexo generate

      - name: algolia
        working-directory: ./
        run: |
          export HEXO_ALGOLIA_INDEXING_KEY=${ { secrets.API_TOKEN_ALGOLIA_INDEXING_KEY }}
          hexo algolia
        #                                    ^ 去掉這個空格,因為不能正確渲染2個括號
      - name: Pushes to another repository
        uses: cpina/github-action-push-to-another-repository@main
        env:
          API_TOKEN_GITHUB: ${ { secrets.API_TOKEN_GITHUB }}
        #                     ^ 去掉這個空格,因為不能正確渲染2個括號
        with:
          source-directory: "./public"
          destination-github-username: "minz71"
          destination-repository-name: "minz71.github.io"
          user-email: xxx@gmail.com
          target-branch: main
設定GitHub Page
-
到公開的 Repository > Settings > Page
-
設定 Custom domain (在 DNS 添加 CNAME 紀錄)